Since the time of Art Tatum and Charlie Parker, the practice tools of the jazz musician have consisted of three basic things: a room, your instrument, and a record player. If you wanted to get some work done in the shed, that’s all you needed…
Nearly 70 years later, things are still the same for today’s modern jazz musician. Wherever we are, we just need to get into a room with our instruments and a record player to practice this music. However, for many of us, that record player has transformed into a computer, and you can do a lot more than just play recordings on it.
To get the most out of your time in the practice room you should make use of the tools and technology available. Instead of banging your head against a wall in frustration while trying to figure out a solo from a record, there are some programs and software that will make your job a lot easier. Here are a few ways to use technology to your advantage in your quest to improve as improviser.
Online Resources
Gone are the days of searching far and wide for an elusive recording or waiting for a CD to arrive in the mail in order to learn a tune that you’ve been wanting to add to your repertoire. In seconds you can download virtually any recording you want to directly onto your hard drive.
You probably are already checking out your favorite players on YouTube and Google videos during your free time, so why not make this an essential part of your practice time.
The next time you learn a tune, try to listen to as many versions as you can on Youtube, as we do with On Green Dolphin St. in this article. Say you’re trying to learn Horace Silver’s Nica’s Dream. Just by doing a search for it on Google, you immediately get dozens of great results. If you can’t find it on video, you can always buy an mp3 of exactly what you want. Once you find the version of the tune or solo that you want to learn, download it and add it to your practice queue.
To download Youtube videos, check out this free Mozilla Firefox add-on called Unplug. There are also dozens of free online sources to convert and download youtube videos or other video formats to mp3.
Regardless of where you look, make sure you make use of the resources available online to you as you build your repertoire and transcribe solos.
Transcribe
Once you have downloaded that video or song, or picked one out from your collection, it’s time to start tearing it apart and absorbing every aspect of it into your playing. Say for example, that you’re trying to learn Parker’s blues head Relaxin’ at Camarillo:
Many times, the recordings or solos that we’re trying to figure out are initially too fast for our ears to comprehend. Sometimes the tempo is way too fast to decipher individual notes and at others times, you may just want to slow down a fuzzy recording to ensure that you’ve got the right notes. This is where a program that can slow down video and sound files comes in handy. The best one out there today is a program called Transcribe.
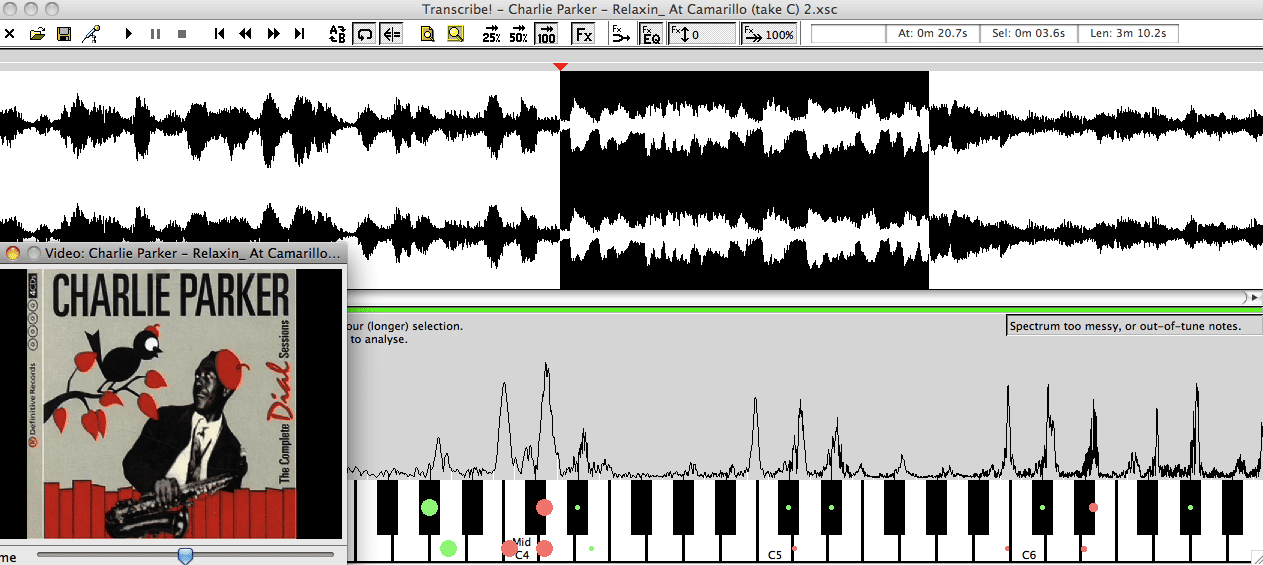
Simply take the file from your collection or one that you’ve downloaded and drag it into Transcribe. In this case, we’ll take the version of Relaxin’ at Camarillo that we downloaded from YouTube.
After you’ve dragged the sound or video file into the program, it automatically creates a visual display of the sound file. Once it’s in there you can do a number of very useful things with the file that make the transcription process much easier.
To start with, determine a section of the tune that you want to focus on and figure out. Highlight that section of the clip (the black area in the image above) and it will create a repeated loop of the selected area. After you’ve picked a specific section to work on, there are a number of tools and effects to use that will make learning the section easier.
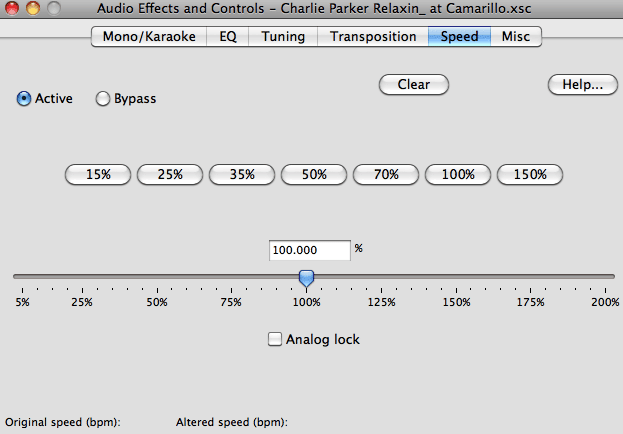
Begin by slowing the tempo down so you can clearly hear and sing every note. For extremely fast tempos, a good place to start is by reducing the speed to 50%. When you’ve got the notes down and can play them easily with the recording, bump up the tempo to 60%. Continue in this manner, gradually increasing the tempo until you’re playing along with the recording at the original speed. As you can see from the speed options above, you can even take the tempo past 100% if you are feeling especially adventurous.
Another option you have with this program is the ability to change the key of the sound or video file. You can simply raise or lower the key by half-steps or whole-steps until you’ve found the key and octave that you desire. Hearing the same solo line and rhythm section in each new key is especially helpful when you encounter keys that are difficult. Once you have the line or melody in the original key, try to take it through all 12 keys successively, until each key feels equally easy.
When you break up a tune or solo into different sections and gradually work them up to speed as shown above, the once daunting task of learning an uptempo Charlie Parker solo in all 12 keys seems surprisingly manageable. You aren’t losing anything or cheating if you slow a recording down, in fact, you’ll actually be hearing those intervals, chords, and lines more clearly and precisely than if they were flying by at a break-neck tempo. By repeating a section of a solo and slowing it down, you can eliminate one of the most frustrating parts of the transcription process.
As your ear improves through this process, you will find that you’ll be able to figure out lines at progressively faster speeds, and as a result, will have to slow tempos down less often. But until then, you have to start somewhere and Transcribe is a great tool to get you there.
Music production software
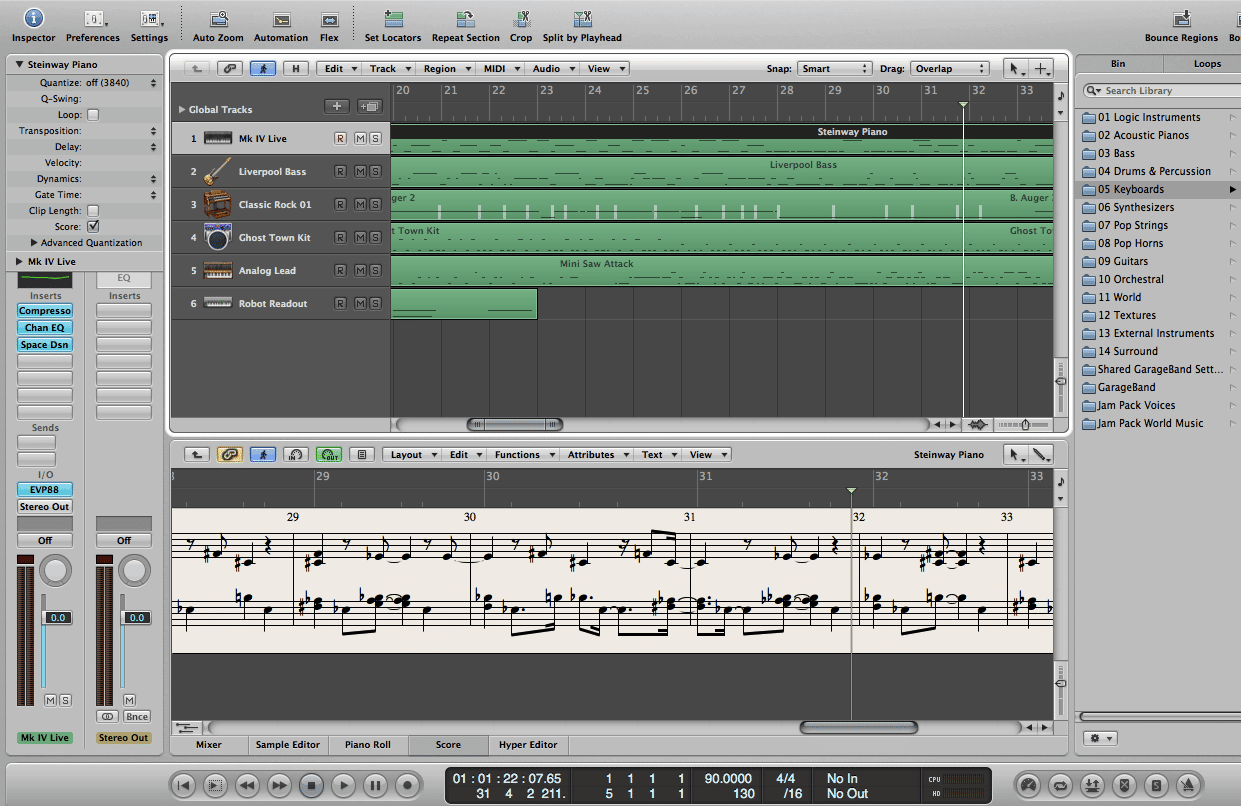
Another tool that can greatly enhance the effectiveness of your time in the practice room is a music production program. Look into using a program like Logic or Abelton Live to enhance your practice routine. These programs are very complex and go way beyond just making beats for techno music. Below is a sample screen shot from a project I worked on in Logic.
As you can see from the image above, there is a lot to work with here. You can choose sounds from a library of hundreds of instruments, record live instruments, incorporate pre-made loops, and add plug-ins or effects to the tracks you record. If you input the track with a MIDI keyboard or controller, the program will even transcribe what you played, as it did on my project in the image above.
Needless to say, Logic is a very deep program and there are a number of ways to use it to aid your practice of improvisation. Here are a few examples:
Practice with a drone
A simple way to augment your normal practice routine is to loop a drone (sustained pitch) note. As you warm up for instance, practice long tones against this drone note. Focus on your sound and intonation as it relates to that constant note. Work on scales over the drone note and carefully slot each interval (Maj. 2nd, Tri-tone, minor 7th, etc.) as it relates to the drone. This is not only great work for intonation, but excellent ear training as well.
Another thing to try is improvising over that sustained tone. Because your harmonic backdrop is just one note, not a chord or progression, you can imply any number of harmonic ideas. Imply a major tonality, a minor tonality, a V7sus sound, a ii-V7 progression, or improvise freely without harmonic restriction.
Loop a chord or progression
One thing that we’re always working on is gathering pieces of language and improvising over specific chords and progressions. A great way to master these sounds is to loop them and work them out over and over again. For example, you might be working on half-diminished chords. Record a half-diminished chord into the program with a keyboard or MIDI controller and loop it. You can even add a beat to the track if you like.
Now work on developing a piece of language that you’ve transcribed over that half-diminished sound. Start with the line you’ve learned note for note, then improvise with it, adding notes and altering the rhythm, but retaining the original theme in some variation.
Do the same exercise with ii-V progressions or even whole tunes. By hearing the progression repeatedly, the sound will become ingrained in your mind and you’ll be able to not only recognize it in real time, but be able to navigate it effortlessly in your solos.
Work on odd time signatures
Another use of this software that will benefit your practice routine is creating odd time signature vamps to practice over. To start, pick a simple chord or tonality to work with (a Maj.7th or minor 7th chord, for example) and change the time signature to 5/4 or 7/4. Remember the time signature is the focus here, so make the harmonic choice a simple one.
Once you’ve recorded the chord, add a beat behind it. You can either make your own or choose a pre-made one from the library of clips. If you create your own rhythmic track, experiment by dividing the measure up differently. If you are creating a track in 7/4, divide the measure into a 2+2+3 feel with two half notes and two dotted quarter notes. Or try the opposite, a 3+2+2 feel with the dotted quarters coming at the start of each measure.
See how many variations you can come up with in time signatures like 3/4, 5/4, and 7/4. Recording your very own play-a-long track in a program like Abelton Live or Logic is a great way to become familiar with odd time signatures.
Composition
Logic has a bank of hundreds of instruments to choose from and numerous effects to apply to these sounds. This is an invaluable tool for composition. With a keyboard and your own instrument, you can use Logic or Abelton Live as your own composition studio. With these programs you don’t have to wait for a live rhythm section to hear the general sound of your tune, you can create the chord progression and rhythmic backing right away.
These ideas are just the tip of the iceberg when it comes to a program like Logic. Aside from practice and composition, you can use Logic to perform in live settings by adding effects and loops to your sound and solos. If you are creative, there are limitless ways to use this program to your advantage.
Recording yourself
One benefit of having this technology is that you can record yourself reasonably well without going into a studio and spending tons of money. With the help of some good equipment (microphones, software, etc.) you can produce some high quality recordings of yourself or your group.
For wind instruments, we rarely hear what we sound like when we play because we are behind our instruments. Recording yourself when you play is a good way to see what is actually coming out of your horn. The next time you are in the practice room or at a jam session, turn on your recorder. You can use a program like Logic or Abelton Live and a microphone to record yourself or even a hand held digital recorder.
As you listen back, ask yourself: Is my sound the way I want it to be? Is my articulation flowing and swinging? Am I in tune with the rest of the group? Is my time solid?
When we play we are hearing from our own (the player’s) perspective. We may think we are playing a certain way, when in fact, our mind is influencing the way we hear ourselves. By switching to a listener’s perspective, we can determine what we really sound like. Just keep in mind that the room that you record in can contribute heavily to the quality of your recorded sound.
You still have to practice…
All of this technology will enhance your learning, but that doesn’t take away from the fact that you still have to spend time with your instrument and practice in a dedicated manner. That being said, however, you should take advantage of the technology and tools around you.
Aside from the tools above, you may want to get a quality pair of headphones and computer speakers so you can actually hear what you’re working on. And if you end up composing a lot, it would be worthwhile to invest in some music notation software like Finale or Sibelius, so you can quickly notate and print out your tunes for the musicians in your group.

