As melodic improvisers, we are naturally focused on the harmonic aspect of what we are playing. After all, there’s nothing worse than playing wrong notes, right? Our minds are so concerned with what key a tune is in, what note choices work well over a specific chord, and how to navigate a difficult progression, that other aspects of musicality tend to be ignored.
As a result, the rhythmic aspect of our improvised lines tend to be the first thing that is thrown to the wayside as we solo. It’s goes without saying that notes and chords are important in creating a great solo, but your time and rhythmic conception are just as essential to expressing yourself musically.
For non-drummers, developing an advanced sense of rhythm can be quite an undertaking. To go from the perspective of only worrying about keeping time in 4/4, to playing successfully in odd meters or even using polyrhythms in your solos takes some serious practice. A reader recently wrote in on this subject:
I’d like to get deeper into rhythmic displacement. I’ve practiced three against four and five against four. It works so far, but I don’t get it to the point that it sounds musical and not just mathematical. I would greatly appreciate learning about some approaches to rhythmic displacement.
Master the basics
The key to progressing at any skill is to first master the basics. This proves to be true whether you are working on instrumental technique, playing over chord changes, or are experimenting with new rhythmic concepts. However, I can tell you from experience that this is much easier said than done. Most of the time we in such a rush to improve, that we skip over the fundamentals without actually learning them.
We want to play high and fast on our instruments before we can produce a good sound, we want to alter chords and play outside before we can play well over basic chords, and we work on tunes like Giant Steps before we’re proficient on a standard 12 bar blues.
It’s natural to be excited about improving and moving forward musically is a positive thing. However, be aware of the tendency to skip over things that seem “easy.” Having a strong grasp of the fundamentals is essential to mastering more advanced concepts and eventually executing them musically in your solos.
Approaching the basic polyrhythm
The first step to becoming comfortable with polyrhythms is fostering the ability to hear and feel polyrhythms. Begin with some Rhythmic Ear Training. The goal is to shift your rhythmic understanding from a solely mental perspective to one that relies upon your aural and physical conception of time.
For the purposes of this article, I’ll use the polyrhythm of 5 over 4 (5:4) as an example:
When working on time or rhythmic concepts, a metronome is an essential tool. If you don’t have the metronome on when you’re working on these exercises, you’re not really practicing.
Start by turning on your metronome to a manageable tempo and work on singing the basic polyrhythm of 5 quarter notes over 4 quarters notes. Count the five notes out loud or find a five syllable word (e.g. Min-ne-ap-o-lis) that works evenly over the four quarters. The next step is to tap your foot with the beat or clap the four quarters and sing the five on top.
As that begins to feel comfortable, try an independence exercise. Tap four quarters with your left hand and five with your right hand, then try the reverse. Practice this until feeling four and five simultaneously becomes natural.
Eat, drink, and sleep this rhythm until it is ingrained into yourself, both physically and mentally. Remember, if you want to improvise freely with this polyrhythm, you must first ingrain the basic 5 over 4 before you move on. Your success as you get more rhythmically complex relates back to how well you’ve ingrained the original polyrhythm.
Instrumental technique
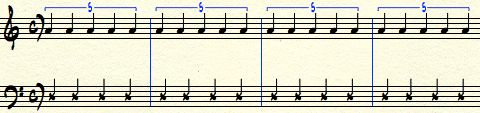
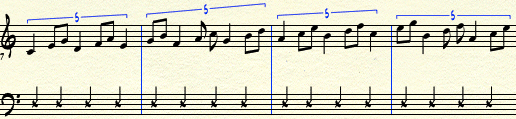
Once you feel that you have control of the basic 5:4 feel, it’s time to move onto your instrument. There are endless ways to incorporate this rhythm into your daily routine. Try practicing some ascending and descending scales using the 5:4 polyrhythm and take it through all 12 keys:
Play your scales in thirds in all four directions utilizing the 5:4 polyrhythm. In this exercise, we encounter a pattern that goes across the bar line, which is an effective way to create rhythmic tension in a solo. Keep in mind that the rhythm is the focus here, so pick a scale or pattern that you are comfortable with.
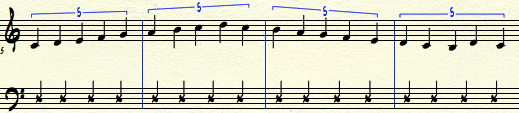
Practice arrpegiating different chord types ascending and descending. For example, ascending minor 9th chords moving up by half-steps:
This type of technical practice (scales, intervals, arpeggios, etc.) should already be a part of your routine and incorporating polyrhythms is a good way to mix things up and create new material for your solos.
Explore some variations
Now that you have the basic 5:4 polyrhythm down, it’s time to start exploring some different ways of playing that feel. Don’t limit yourself by stopping with the basic rhythm. Just like relying on only one scale to play over a chord type can be a trap, it can be equally limiting to rely on one rhythm. If you stop experimenting rhythmically after learning the basic polyrhythm, you are barely scratching the surface of what’s possible.
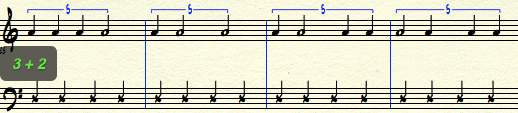
Take the original 5:4 and experiment with putting the 5 notes into 2 and 3 note groups. This will put the emphasis on different parts of the beat. For example, 3 + 2 pairings:
And the reverse, 2+3:

As that exercise begins to feel comfortable, it’s time to start subdividing those 5 quarters into eighth notes. Keep in mind that the rhythm will continue to get more and more complex, so make sure you’ve got the original 5:4 completely solid before moving on.
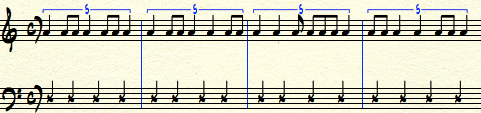
Begin by taking one quarter out of the five and changing it into two eighths. When you can accomplish that, see how many combinations you can come up with quarter and eighth notes. Again, start slowly by clapping or singing the rhythm. Below are a few examples:
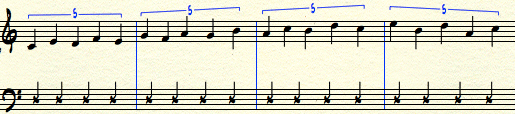
Eventually, try to play 10 even eighth notes over the four quarters on the metronome. As that becomes easy, go back to your instrument and incorporate some of the scale patterns from the above examples, this time in eighth notes:
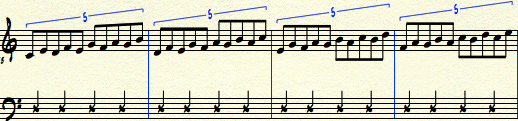
Likewise, try the pattern below of ascending diatonic triads shown below. Notice how this pattern goes over the bar line, creating substantial rhythmic tension:
These are just a few ideas. Experiment with combining varying note values (half-notes, quarters, 8ths, 16ths). Add beats of rest into the lines, try grouping notes together in different ways, and add different articulations. There are a ton of possibilities and the above examples, while necessary, are just scratching the surface.
Thinking musically
Theories, techniques, and concepts abound in jazz, but mentally comprehending or practicing them will not automatically make them musical. A line can be theoretically correct over a certain chord progression or a rhythm can be copied from a book, but until you master the basic concept, explore some variations, and develop your own way of expressing those techniques, they simply won’t sound musical.
Ask yourself: What makes a line musically pleasing for me?
Your answer probably has to do with harmonic consonance and dissonance, intervallic structure, accents, and rhythmic groove and displacement. In other words: tension and release. The movement between harmonic tension and resolution, the change in dynamics from forte to pianissimo, and the shift from rhythmic displacement to laying right in the pocket.
If you alter every chord you encounter or play a polyrhythm for your entire solo, it’s just not going to be musical. Use these devices in spots where they’ll be effective. Create harmonic dissonance by altering V7 chord before you resolve it to the I chord. Or, use a polyrhythm to create rhythmic tension and build excitement in your solo as you go from one chorus to the next. The effectiveness of all the devices that you work on in the practice room, from rhythmic displacement to harmonic alteration, rely on how you apply them musically during live performance.
This goes back to what is happening in the practice room. To make a rhythmic technique musical, you have to get past the the initial mental understanding of it and translate it into something that you can use in your playing. If you’re still thinking about what notes work over a certain chord, what keys or valves to press down on your instrument, or counting out a rhythmic pattern as you try to improvise, you’re going to have a hard time creating a successful solo, let alone sounding musical.
However, once you have a concept or technique ingrained into your ear as well as your body, it will be much easier to be creative with it in real time.
Further study
Approach developing the rhythmic aspect of your playing, whether it’s polyrhythms, odd meters, or rhythmic displacement, in the same way that you would develop the harmonic and melodic aspects of your playing. For example, if all you have to play over a Major 7th chord is a basic major scale, you’re going to be very limited harmonically and will have trouble sounding musical.
To remedy this, you need to explore the melodic and harmonic possibilities inherent within that Major 7th chord. You need to transcribe language from the masters and develop your own vocabulary over that chord. Until you do this, you are left with just a basic major scale, and it’s hard to be musical if you leave it there.
Use this same mindset to develop the rhythmic aspects of your playing. Begin with mastering the rhythm in its most basic form, then explore variations on that original model. Listen to how accomplished improvisers use this concept in their playing and imitate it to eventually develop your own. As with harmony, there is always more to learn rhythmically.
A great place to start, is to check out some drum method books. Even if you are not a drummer, you can get some invaluable practice by studying those exercises,using your hands or a practice pad to play the rhythm. Even adapt those rhythmic exercises for your own instrument, utilizing different scales and intervallic patterns once you have the rhythms down. One great book dealing with this subject is Peter Magadini’s Polyrhythms – The Musician’s Guide, which is written for all musicians.
Above all, listen to how great players use polyrhythms in their playing. Study master drummers like Elvin Jones or Tony Williams who employed polyrhythms in a very musical way. Watch the clip below of Tony Williams playing with Miles and especially listen to how Tony plays behind Herbie’s solo:
http://www.youtube.com/watch?v=7VfeFZoRUDUAlso, if you haven’t checked out the Dave Holland Quintet, you need to do so right now. Listen below as they take the idea of a polyrhythm to an entirely new level: